
A Smarter Way to Get Professional Results
Thinking about installing cable railings on your deck, staircase, or balcony? You may be surprised to learn that you don’t necessarily need to hire a professional installer to get a beautiful, custom-fitted result.
DIY cable railing installation is an appealing option for homeowners who want the clean lines, open views, and modern appearance of cable railings without the additional cost of professional installation.
But there’s one important consideration: Not all DIY cable railing systems are created equal.
Some kits leave you responsible for measuring, cutting, fitting, and tensioning every cable. Others are designed to eliminate much of that complicated work.
At Paul Kraft MPLS Cable Railings, we take a different approach. We custom-design and fabricate your railing system, prepare the components for your specific layout, and make installation as straightforward as possible.
Here’s how it works, along with answers to some of the most common questions homeowners have before tackling a DIY cable railing project.
1. Is It Difficult to Install Cable Railings Yourself?
The answer largely depends on the system you choose.
With a traditional DIY cable railing kit, you may need to:
- Determine the correct post locations and spacing.
- Measure and drill individual cable holes.
- Cut stainless steel cables to the correct lengths.
- Attach or crimp specialized cable fittings.
- Install and properly tension each cable.
These steps require accuracy, patience, and sometimes specialized tools. Even a small measurement error can complicate the installation.
The good news? You don’t have to do all that work yourself.
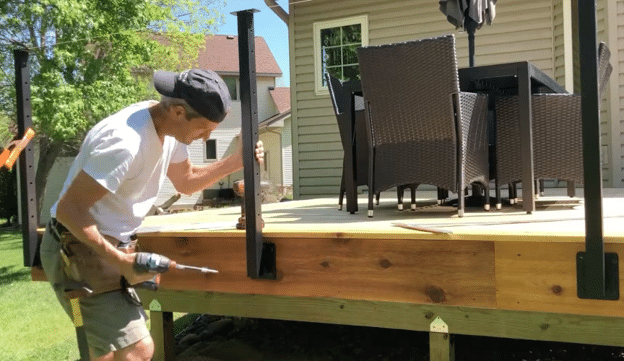
Our custom cable railing systems are designed to simplify the process. We fabricate the posts, predrill the cable holes, and prepare the cables and fittings to your project’s measurements.
That means you can concentrate on securely installing your posts and top rails rather than fabricating the entire railing system from scratch.
2. How Do I Know What Cable Railing Parts to Order?
This is one of the biggest challenges homeowners face when shopping for cable railings.
How many posts will you need? What type of mounting hardware works best? How will you handle corners, stairs, or changes in direction?
With Paul Kraft MPLS, you don’t have to figure everything out on your own.
It starts with a simple sketch.
Send us a rough drawing of your deck or railing area, along with approximate measurements. Photos of the space are helpful, too.
From there, we’ll review your layout, determine the components needed, and prepare an itemized quote for your custom cable railing system.
Whether your project involves a deck, interior staircase, or balcony, we’ll help you plan a system that fits your space.
3. Do I Have to Cut and Crimp the Stainless Steel Cables Myself?
No. And this is one of the biggest advantages of working with Paul Kraft.
In many DIY cable railing installations, homeowners must cut the stainless steel cables and attach fittings using specialized tools. This process, called swaging, requires precision to create properly secured cable connections.
We handle that process for you.
Here’s what makes our installation method different:
Step 1: We fabricate and ship your posts and top rails.
Your components arrive prepared and labeled for your specific layout, along with the necessary lag bolts and screws.
Step 2: You securely install the posts and top rails.
Once the framework is in place, you’ll follow our instructions to take the final measurements for your cable runs.
Step 3: We custom-cut and fit your cables.
Using your installed measurements, we cut the stainless steel cables to length and professionally swage the end fittings in our Minneapolis shop.
Step 4: We ship the prepared cables directly to you.
Once the cables are ready, they’re shipped to your location, where you can complete the installation.
Step 5: You insert and tension the cables.
Slide the prepared cables through the predrilled posts, insert the tensioner sleeves, and adjust the tension using the supplied wrench and our instructions.
No cutting dozens of cables. No figuring out complex fittings. No purchasing an expensive swaging tool for a one-time project.
It’s a practical way to enjoy the satisfaction and potential cost savings of DIY installation while leaving the precision fabrication to an experienced craftsman.
4. Why Are the Cables Measured After the Posts Are Installed?
You might wonder why we don’t simply send everything together.
The answer is accuracy.
Even with careful planning, small differences can occur between the original measurements and the final installed position of your railing posts.
By having you install the posts and top rails first, we can prepare the cables using the actual finished dimensions rather than relying entirely on estimates.
This helps reduce measurement errors and the frustration of dealing with cables that are too short or too long.
It’s one of the ways our process is designed around helping homeowners achieve a better-fitting finished railing.
5. What Tools Will I Need to Install My Cable Railing?
You won’t need a fully equipped metalworking shop to install one of our custom cable railing systems.
The tools required depend on your mounting surface and project layout, but typical installation involves everyday tools such as a drill, appropriate drill bits, a level, measuring tape, and wrenches.
We also provide the wrench needed to tension your prepared cables.
The most important part is making sure your railing posts are properly anchored to suitable structural framing or another approved supporting surface.
Always follow the project-specific instructions and verify local building code requirements before beginning installation.
6. How Far Apart Should Cable Railing Posts and Cables Be?
Cable spacing is about more than appearance. It’s an important safety consideration.
Many residential building codes use a 4-inch sphere test to limit openings in guards. Because horizontal cables can flex when pressure is applied, they typically need to be spaced closer together than four inches.
Three-inch cable spacing is commonly used, but the appropriate spacing and support layout depend on the railing design and applicable building code.
Post spacing is also important. Wider distances between supports can allow greater cable deflection, while the tension of multiple cables puts significant force on the end posts.
That’s why proper planning matters.
Our custom design process helps determine an appropriate post layout and cable configuration for your project. Local code requirements and the structural adequacy of the supporting surface must still be verified.
7. Can I Install Cable Railings on an Existing Deck?
In many cases, yes.
Cable railings can be an excellent way to update an existing deck, particularly if traditional wood balusters obstruct your view.
However, it’s important to evaluate the existing deck structure before installing a new system.
Your deck framing and attachment points must be capable of supporting the railing and resisting the forces created by tensioned cables.
Depending on the condition of the existing deck, additional structural work may be needed.
Send us photos and rough measurements of your existing deck, and we can help you explore a cable railing layout suited to the project.
8. Can I Customize the Look of My DIY Cable Railing?
Absolutely.
Installing the railing yourself doesn’t mean settling for an off-the-shelf appearance.
At Paul Kraft MPLS, we fabricate custom railing components in our Minneapolis shop, including heavy-wall aluminum posts, top rails, and cable fittings.
Depending on your project, you can choose from options including:
- Surface-mount or fascia-mount railing posts.
- Aluminum or wood top rails.
- Classic black powder-coated posts.
- Alternative finishes such as oil-rubbed bronze, white, silver, and gray.
- Custom layouts for decks, balconies, and interior staircases.
The result is a cable railing designed for your home rather than a generic kit you have to make fit.
9. Is Installing Cable Railings Yourself Worth It?
For many homeowners who are comfortable with basic construction tasks and have a suitable structure to work with, DIY cable railing installation can be a rewarding project.
Doing the installation yourself can help reduce labor costs while giving you greater control over the timing of your project.
But the key is choosing a system that matches your experience level.
Buying a collection of loose parts and figuring out the entire installation independently isn’t the same experience as installing a custom-prepared railing system.
With Paul Kraft MPLS, you get the benefit of professional design and fabrication combined with a process developed to make homeowner installation easier.
And if questions come up, you’re working directly with Paul and Michelle rather than navigating a large, impersonal supplier.
A Custom Cable Railing System Without the Complicated Installation
Since 2011, Paul Kraft has been designing and building cable railing systems with a focus on quality craftsmanship and easier installation.
Every system is prepared with attention to your specific project, from the predrilled aluminum posts and finished top rails to the custom-cut, professionally fitted cables.
You don’t need to become an expert metal fabricator to enjoy a professionally crafted cable railing.
You just need the right system and a clear installation plan.
Ready to get started?
Send Paul Kraft MPLS a simple sketch, a few measurements, and photos of your deck or staircase. We’ll help you turn your ideas into a custom cable railing system designed for a successful DIY installation.
Request a Custom Cable Railing Quote
Or call 612-750-6456 to discuss your project.
